Installation Detail Two Methods for Installing Step Flashing SBC Magazine
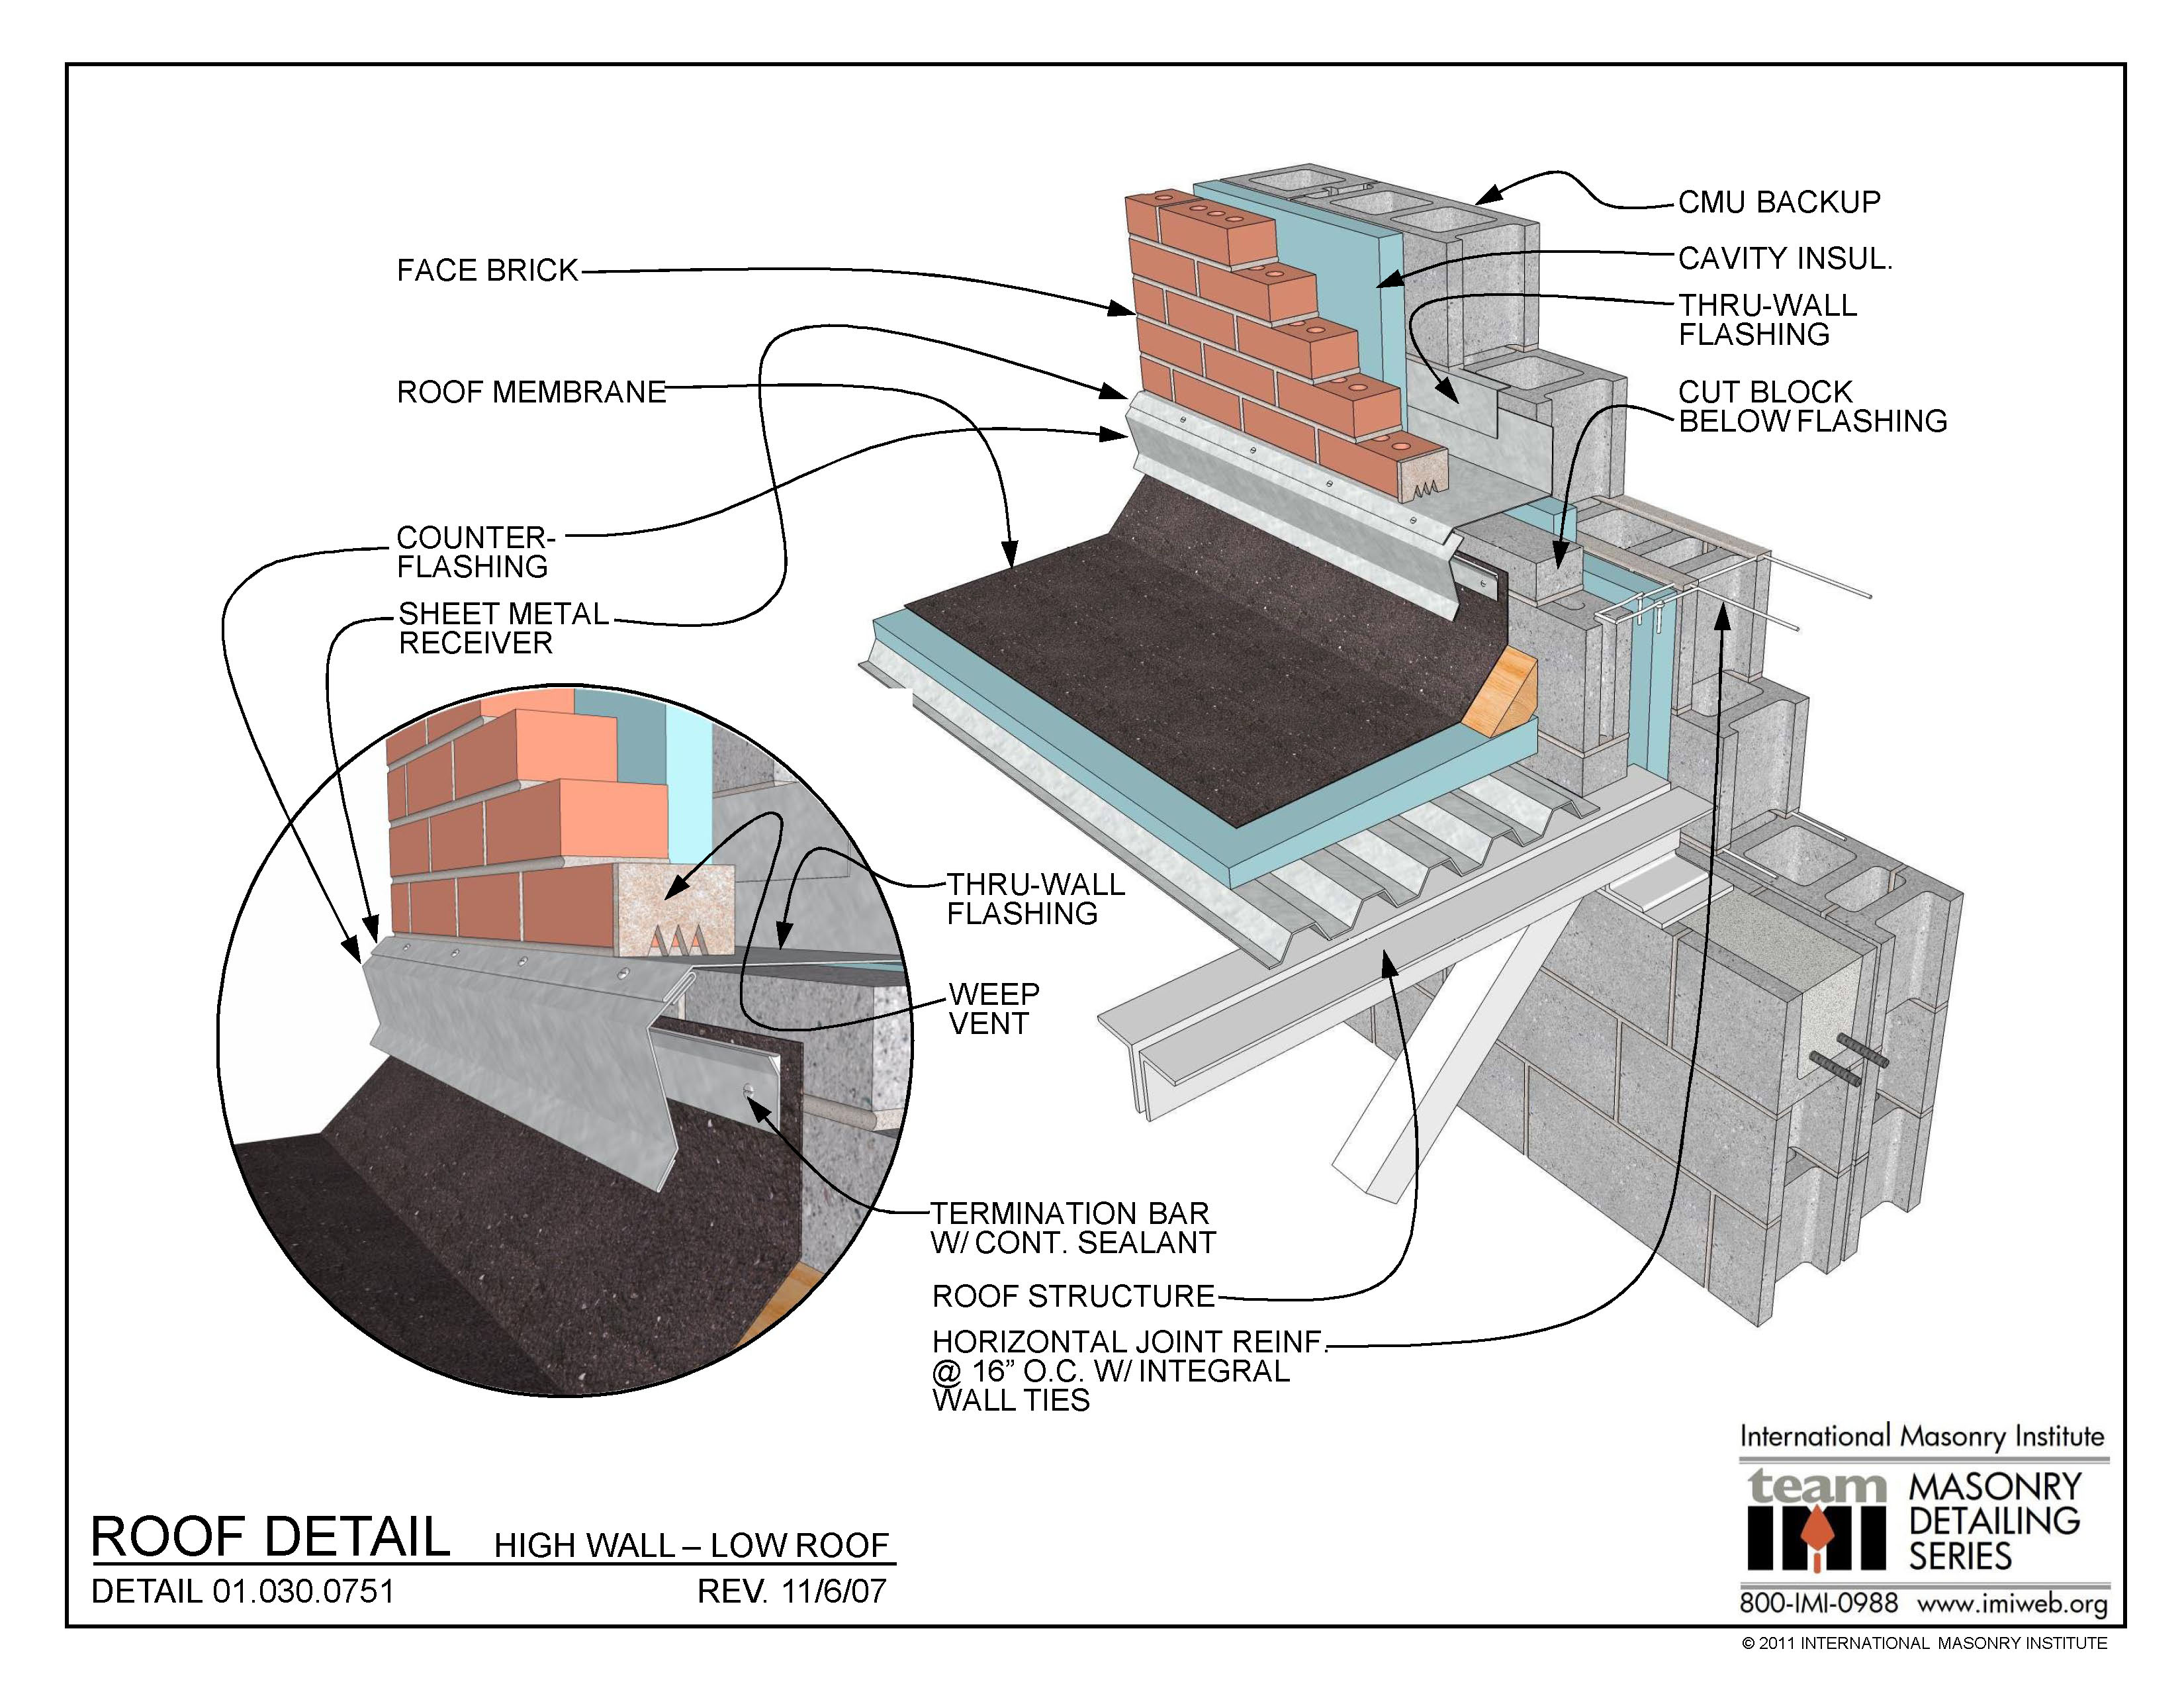
01.030.0751 Roof Detail High Wall Low Roof International Masonry Institute
High Wall Flashing with 10-ft. Wide Sheets In detail 317A, Dave reviews the steps for high wall flashing using 10-ft. sheets. The steps are similar to those of 317C: a base layer of EnergyGuard polyiso and then a layer of reinforced membrane, attached using fasteners and plates.
Understanding Roof Flashing Modernize
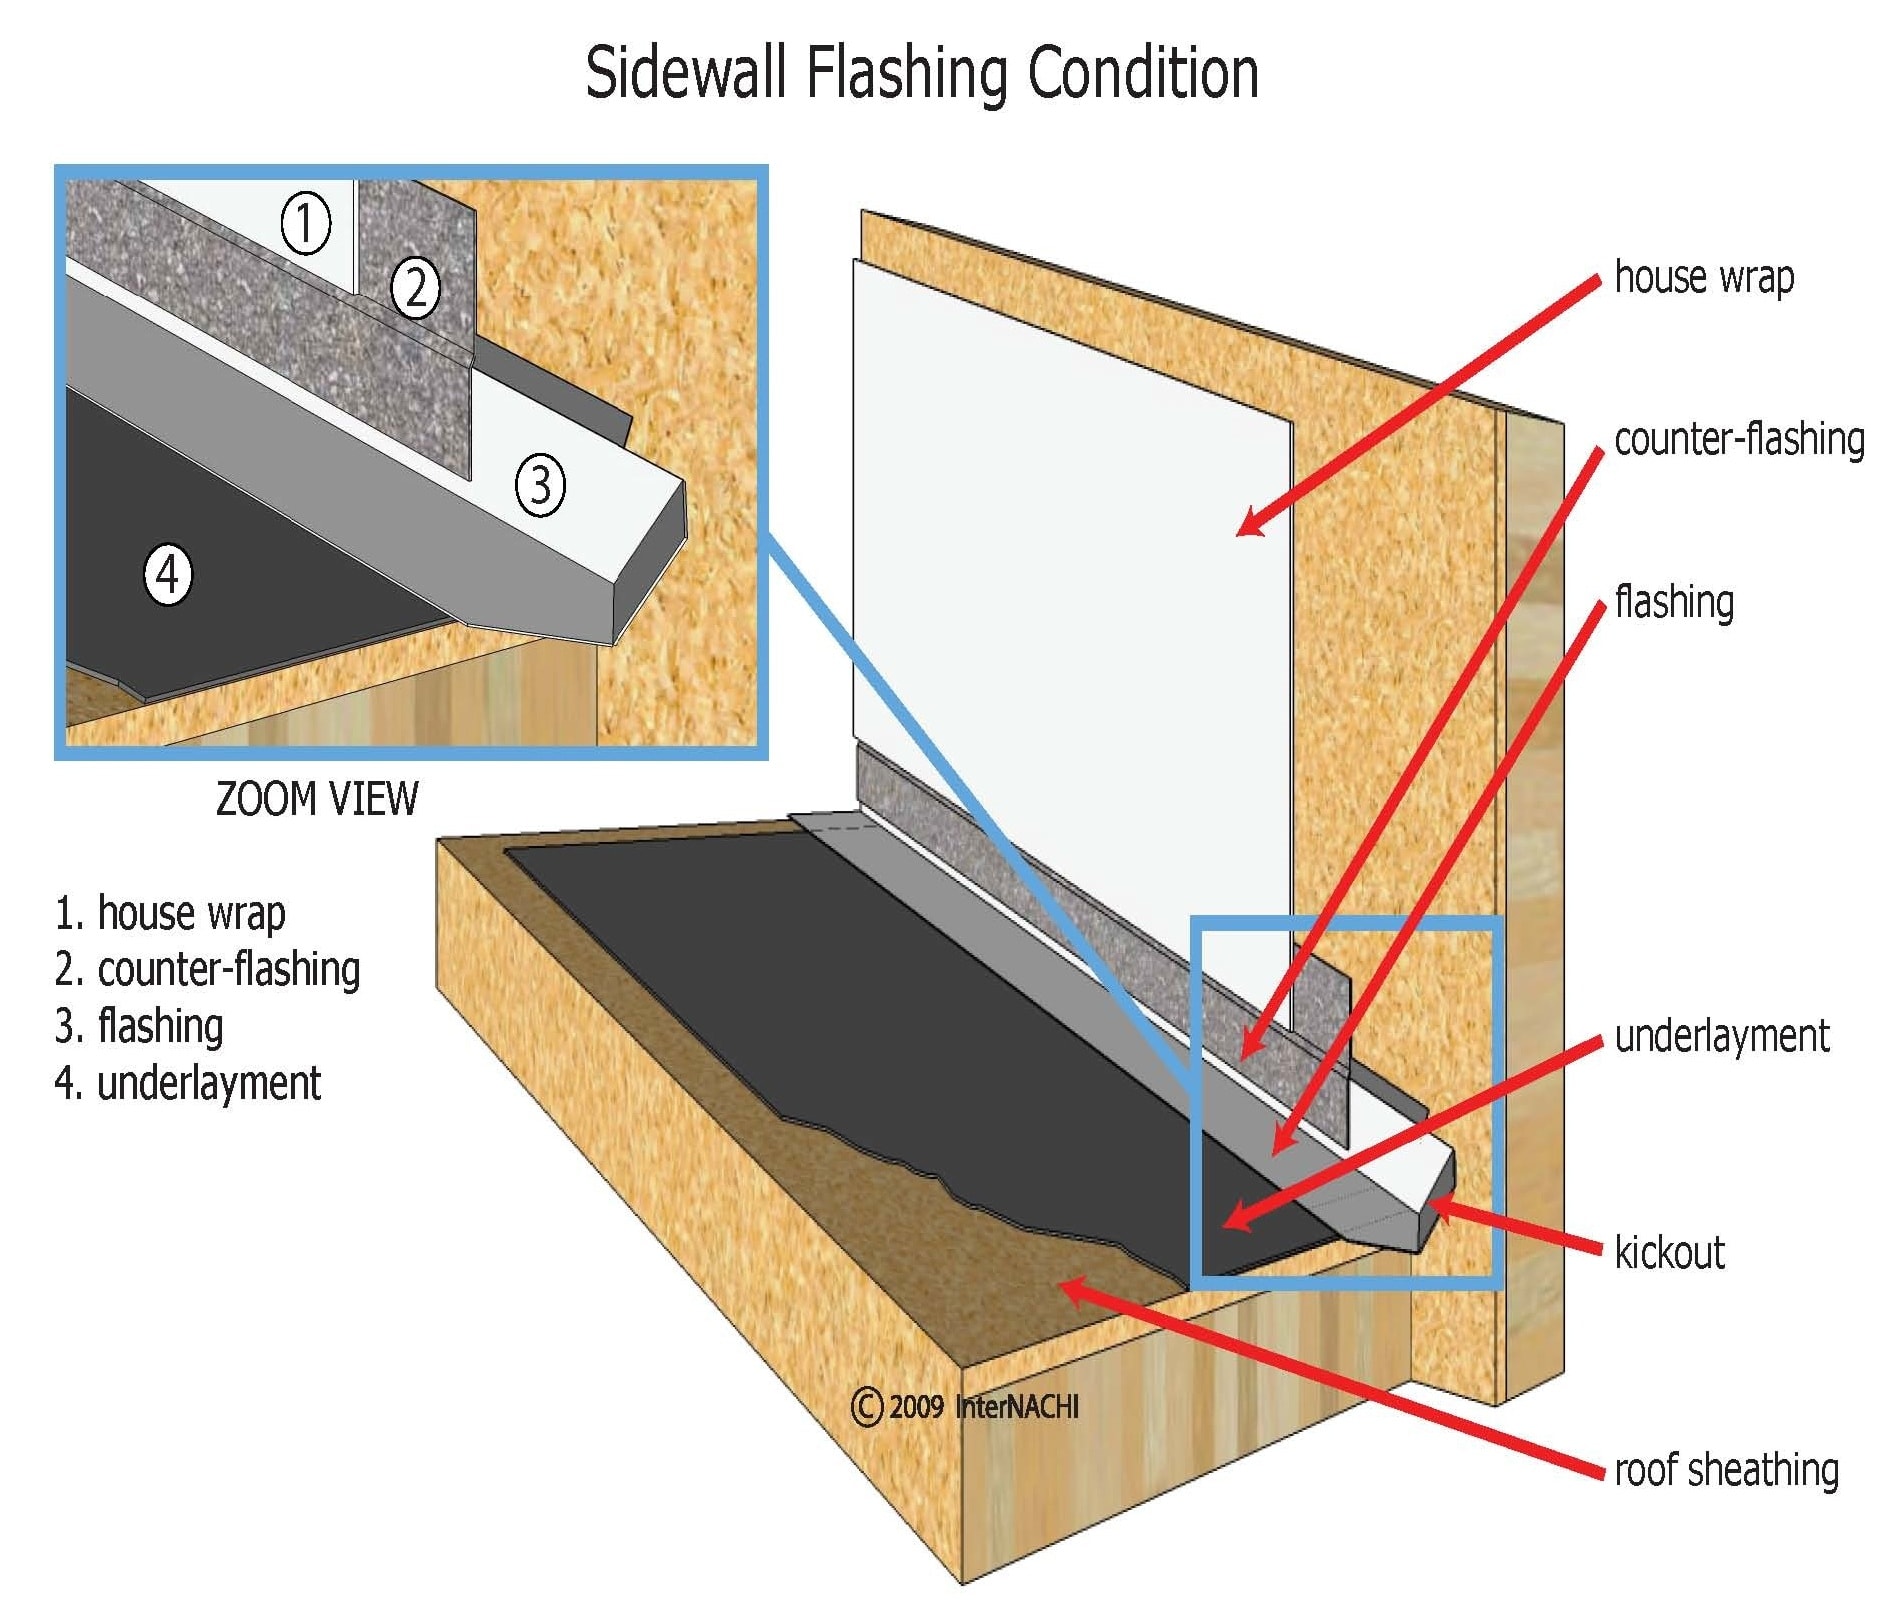
Install a new adhesive membrane (ice and water protector) and metal step or continuous flashing that is properly integrated into the weather-resistant barrier and wall and roof coverings to provide continuous water, air, vapor, and thermal control layers on the walls and roof.

Installation Detail Two Methods for Installing Step Flashing SBC Magazine
Roof flashing is typically a thin metal material fabricated from rust-resistant metal, such as G-90 galvanized steel, a frequently used flashing material, copper, or aluminum. Depending on the company, flashing may even be available in lead or zinc alloy.
Flash a roof
VYCOR® Plus self-adhered flashing installation. VYCOR® Plus provides superior protection against water, air and moisture infiltration in window and door openings, corner boards, under stucco finishes, masonry walls and other flashing areas. VYCOR® Plus is a self-adhered flashing ideal for sealing joints, seams, holes, and other unwanted.
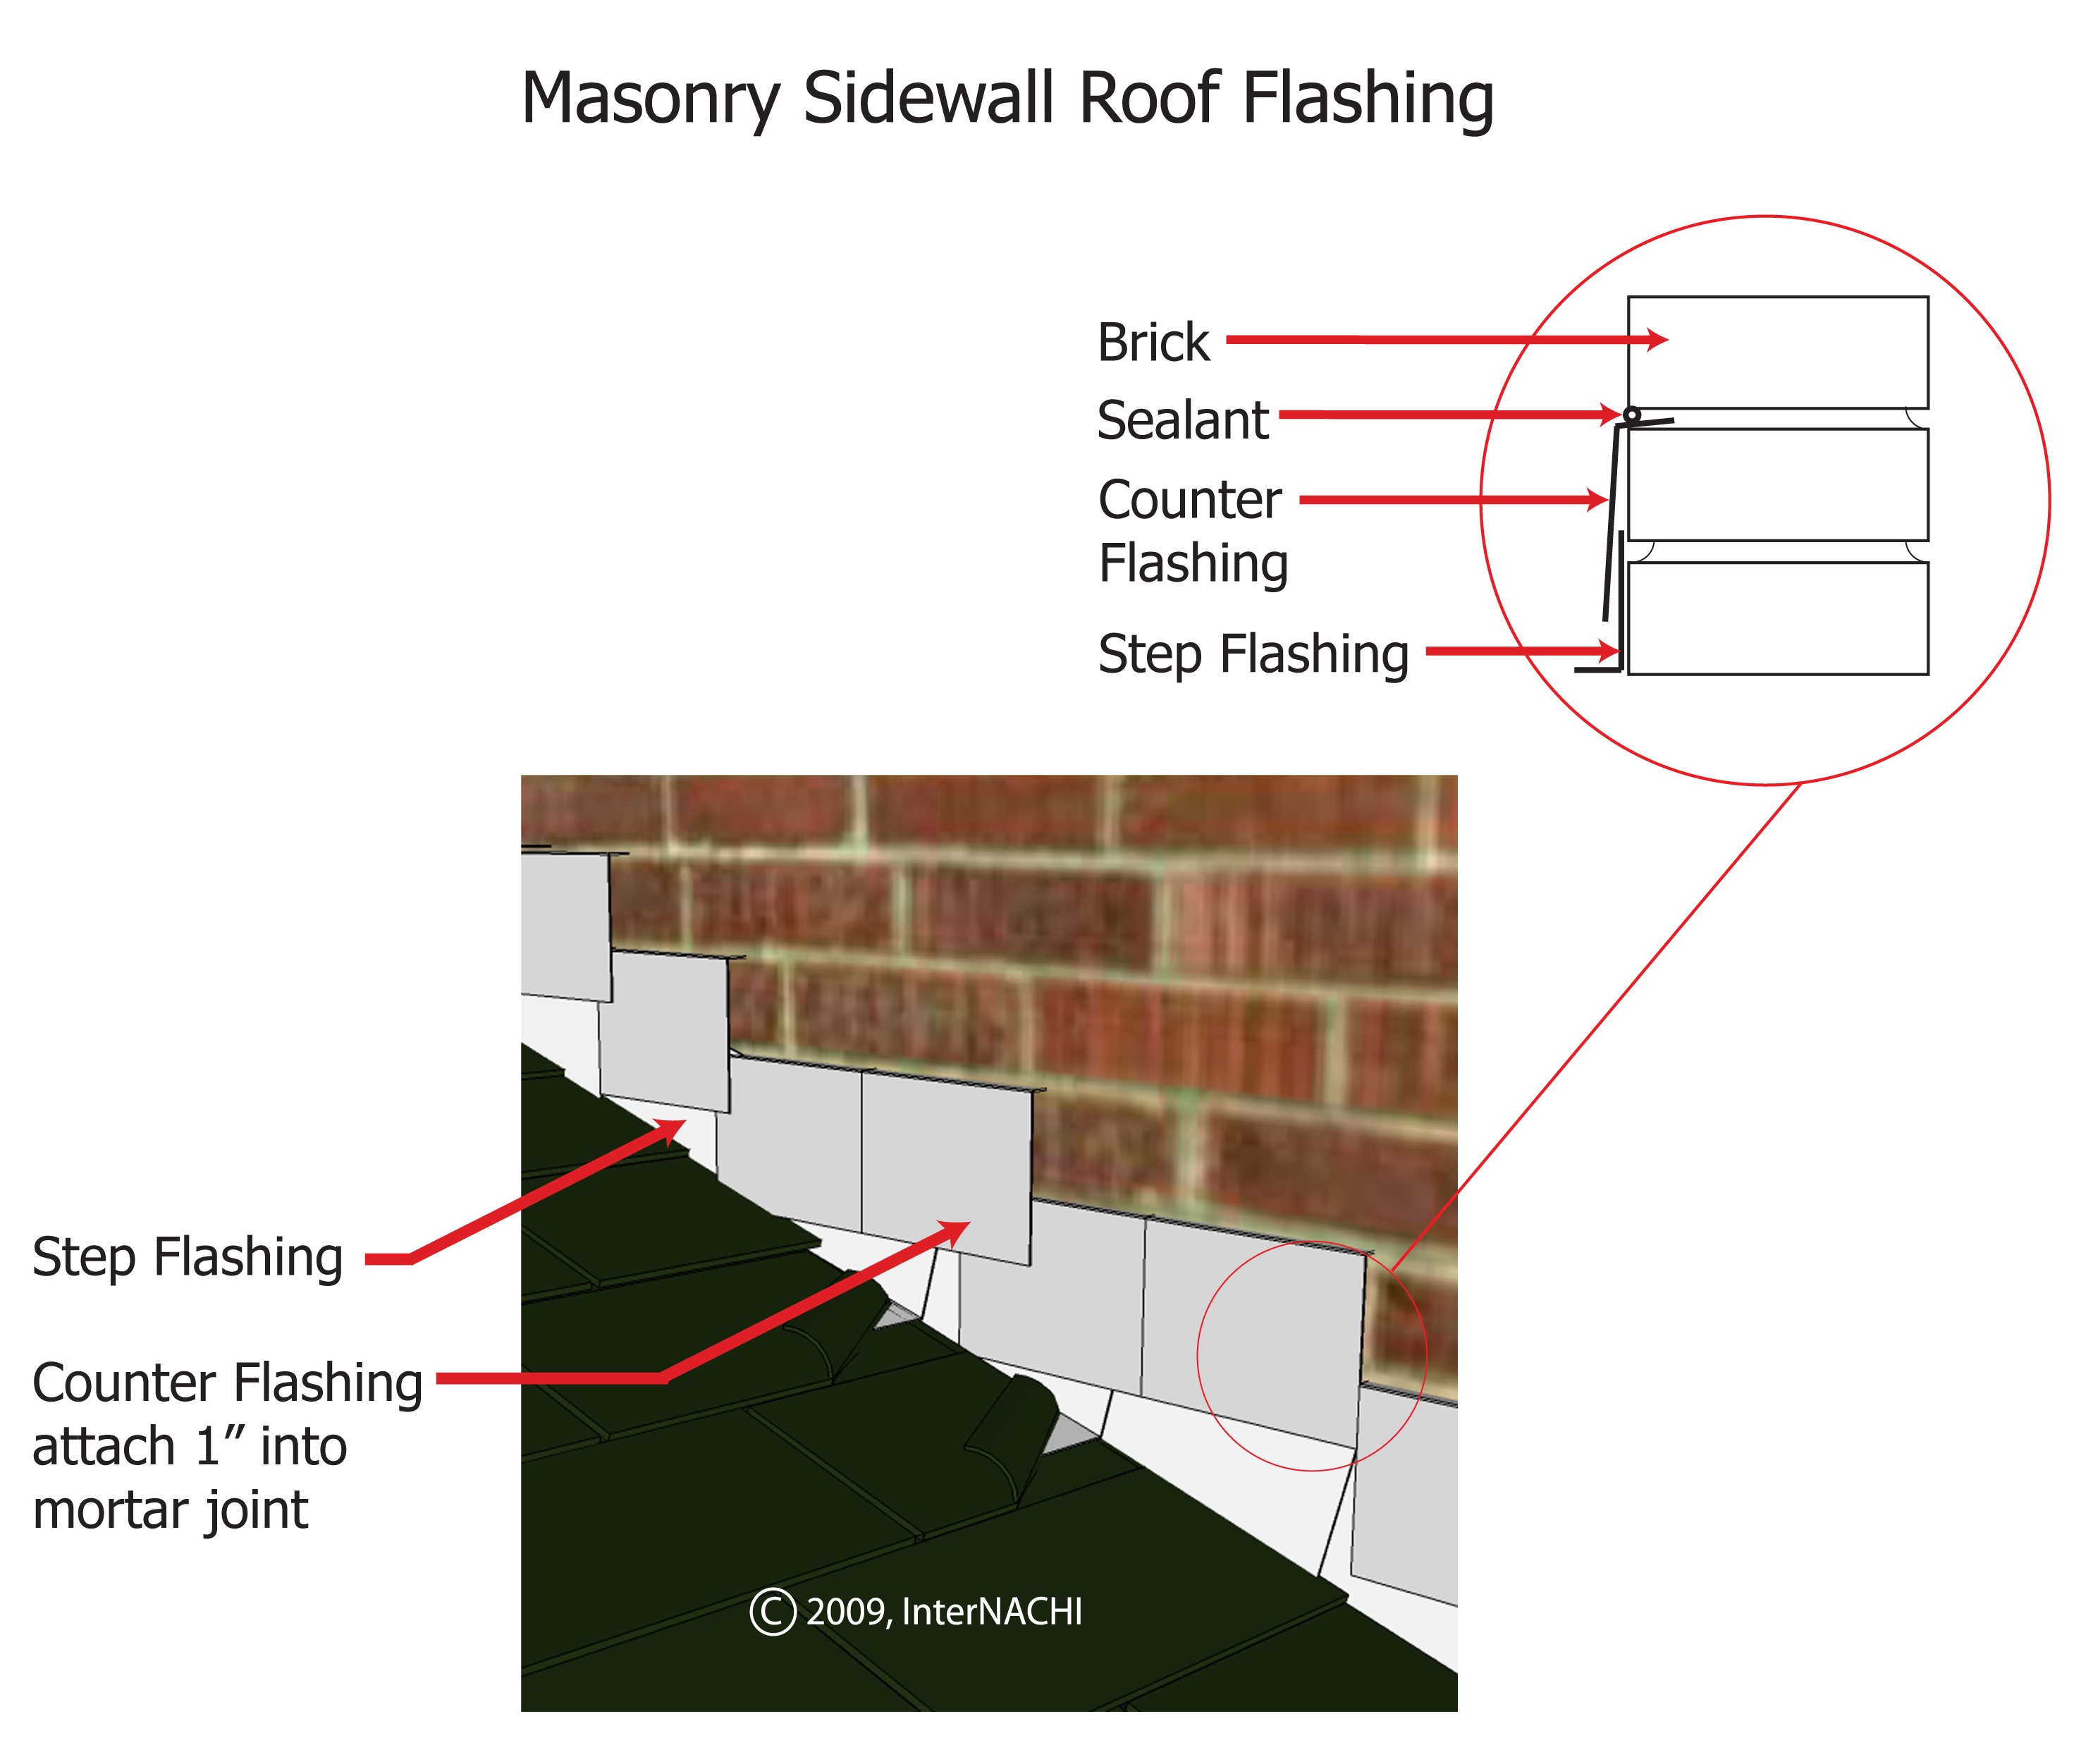
InterNACHI Inspection Graphics Library Roofing » Flashing » masonrysidewallroofflashing.jpg
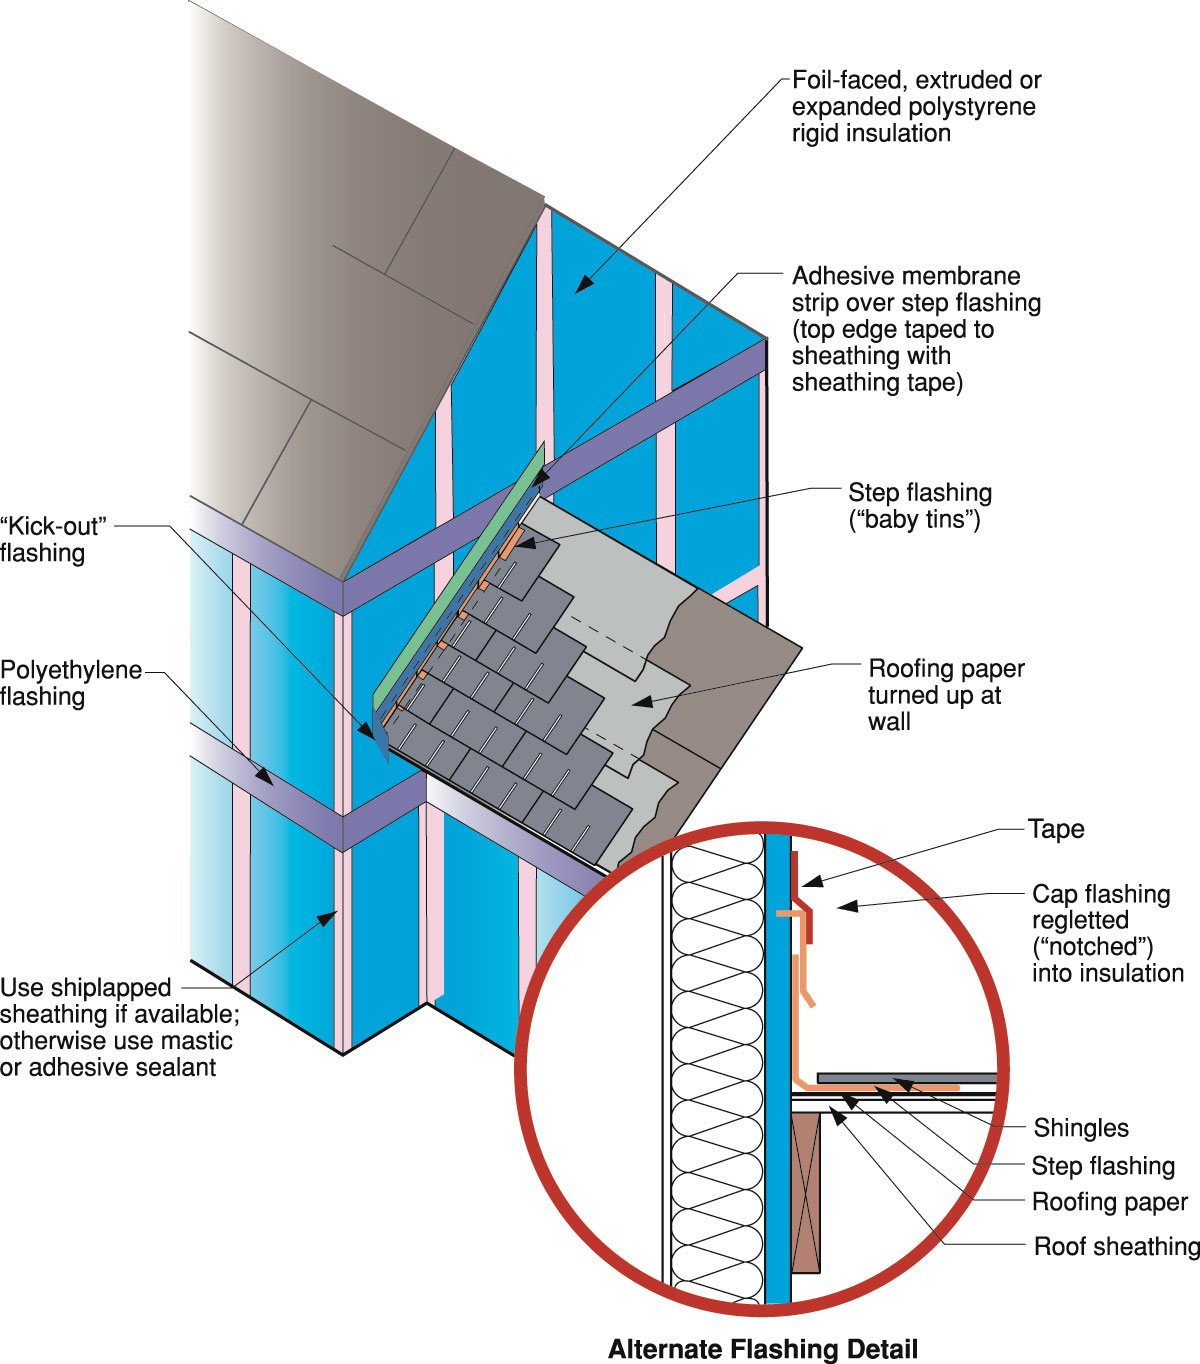
1. Housewrap creates the foundation. Ideally, I like to start by installing a 3-ft. by 3-ft. sheet of housewrap (or even better, a piece of self-adhering roof underlayment) to the wall before the first truss or roof rafter is placed against it. The sheet acts as a backup at a vulnerable junction.

Roofing Details That Work JLC Online
1 2 3 4 5 6 7 8 9 Share 3.1K views 2 years ago How to tape roof valleys, T-joints and vented ridges A critical detail for water intrusion management, the transition from a roof to a wall.

True ThroughWall Flashing for Brick Veneer JLC Online
. CLICK TO ENLARGE Many traditional homes have a wide board, called a water table, along the top of the foundation. The water table should extend about an inch over the foundation, and be protected by a metal drip cap tucked under the housewrap or building paper. WATER TABLE FLASHING

Endwall Flashing Installation On A Metal Roof. EASY Installation Video Wall Flashing On Metal
ROOF & WALL FLASHING ARCHITECTURAL DETAILING This Design Guide has been prepared to assist architects and architectural draftspersons with the design and installation intricacies of detailing roof and wall flashing for metal cladding. Quality of a finished installation is dependent on good detailing. Important note

Pin on Roof
Tips on Installing Roll, Step and Roof-To-Wall Flashing Photo: Atlas Roofing Corporation Flashing plays a critical role in shielding a roof from water damage. Essential for leak-proof performance, flashing protects intersections of the roof plane and penetrations through the roof surface.

Roof flashing Building Inspections Brisbane QBIS
Roof to Wall Flashing: Why Details Matter for Single-ply Roofing Systems. Roof to wall flashing is critical to the performance of every single-ply roofing system. These transition points, where the flat part of the roofing system is tied into the parapet wall, are potentially vulnerable areas for water intrusion.
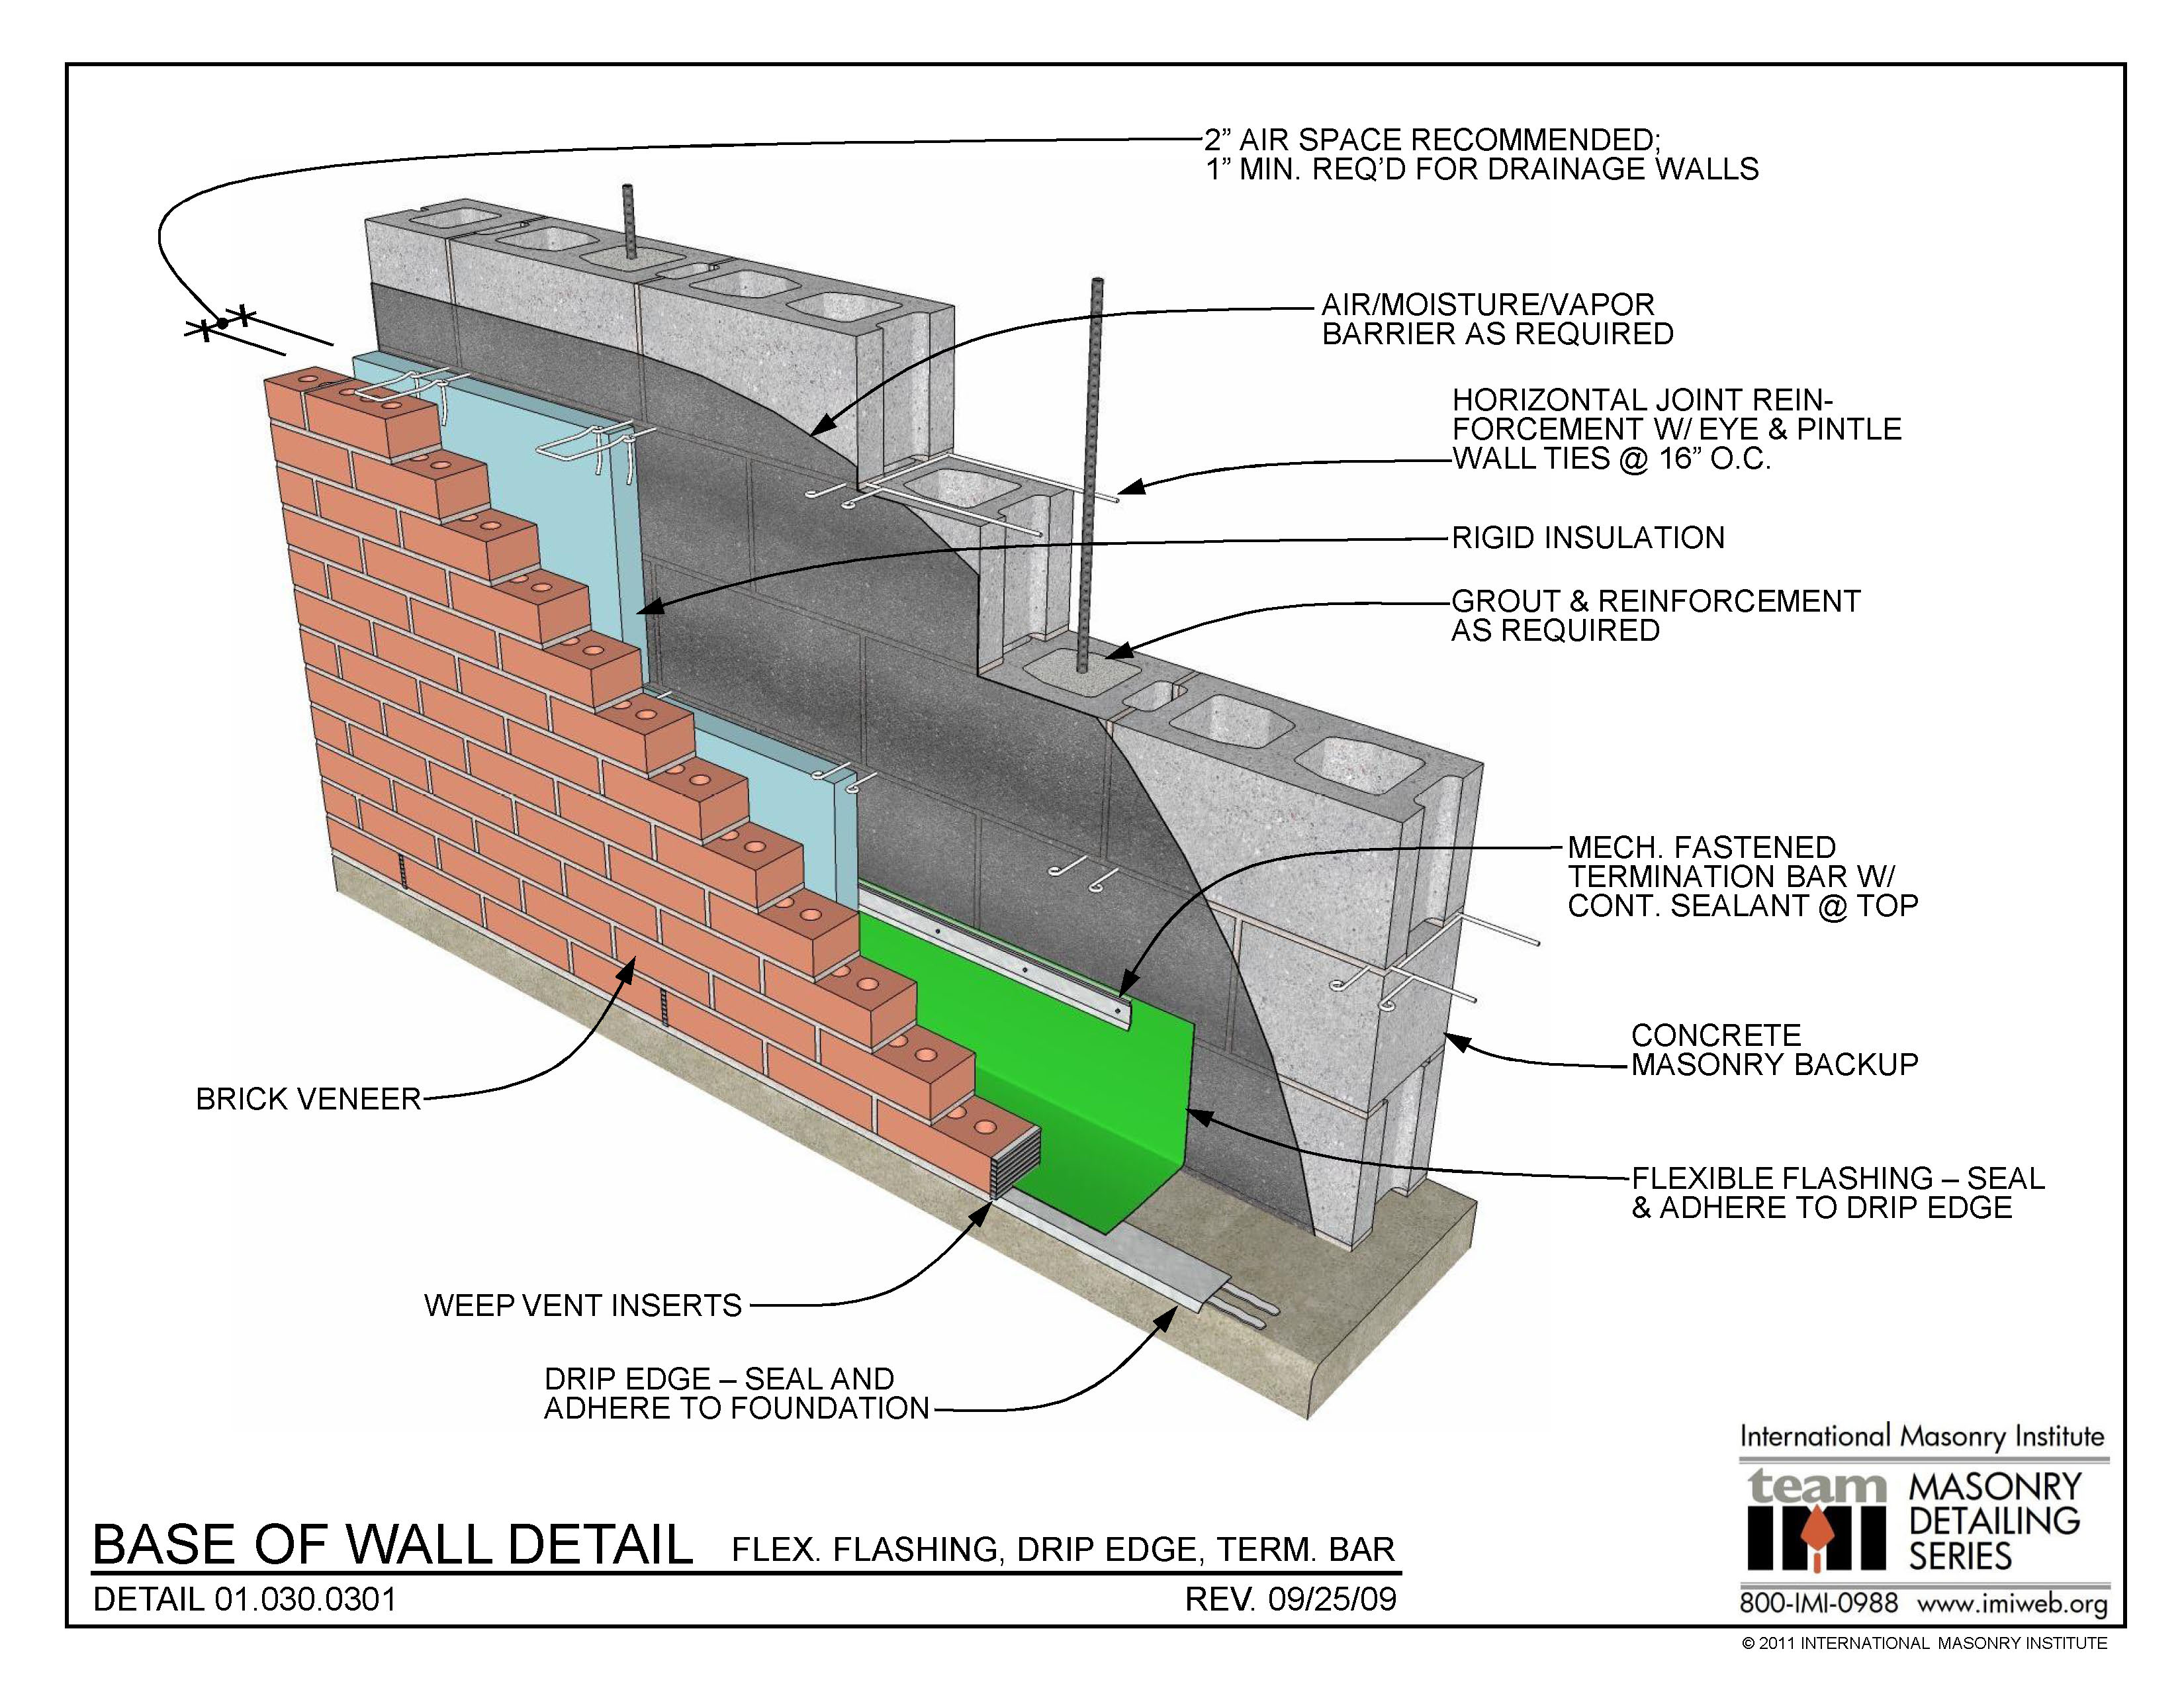
01.030.0301 Base of Wall Detail Flexible Flashing, Drip Edge, Term Bar International
Roof Coating 100 Roof Assembly Detail Download Single-Ply 150 Walkway Pads Detail Download Single-Ply 214 Gutter Edge Detail Download
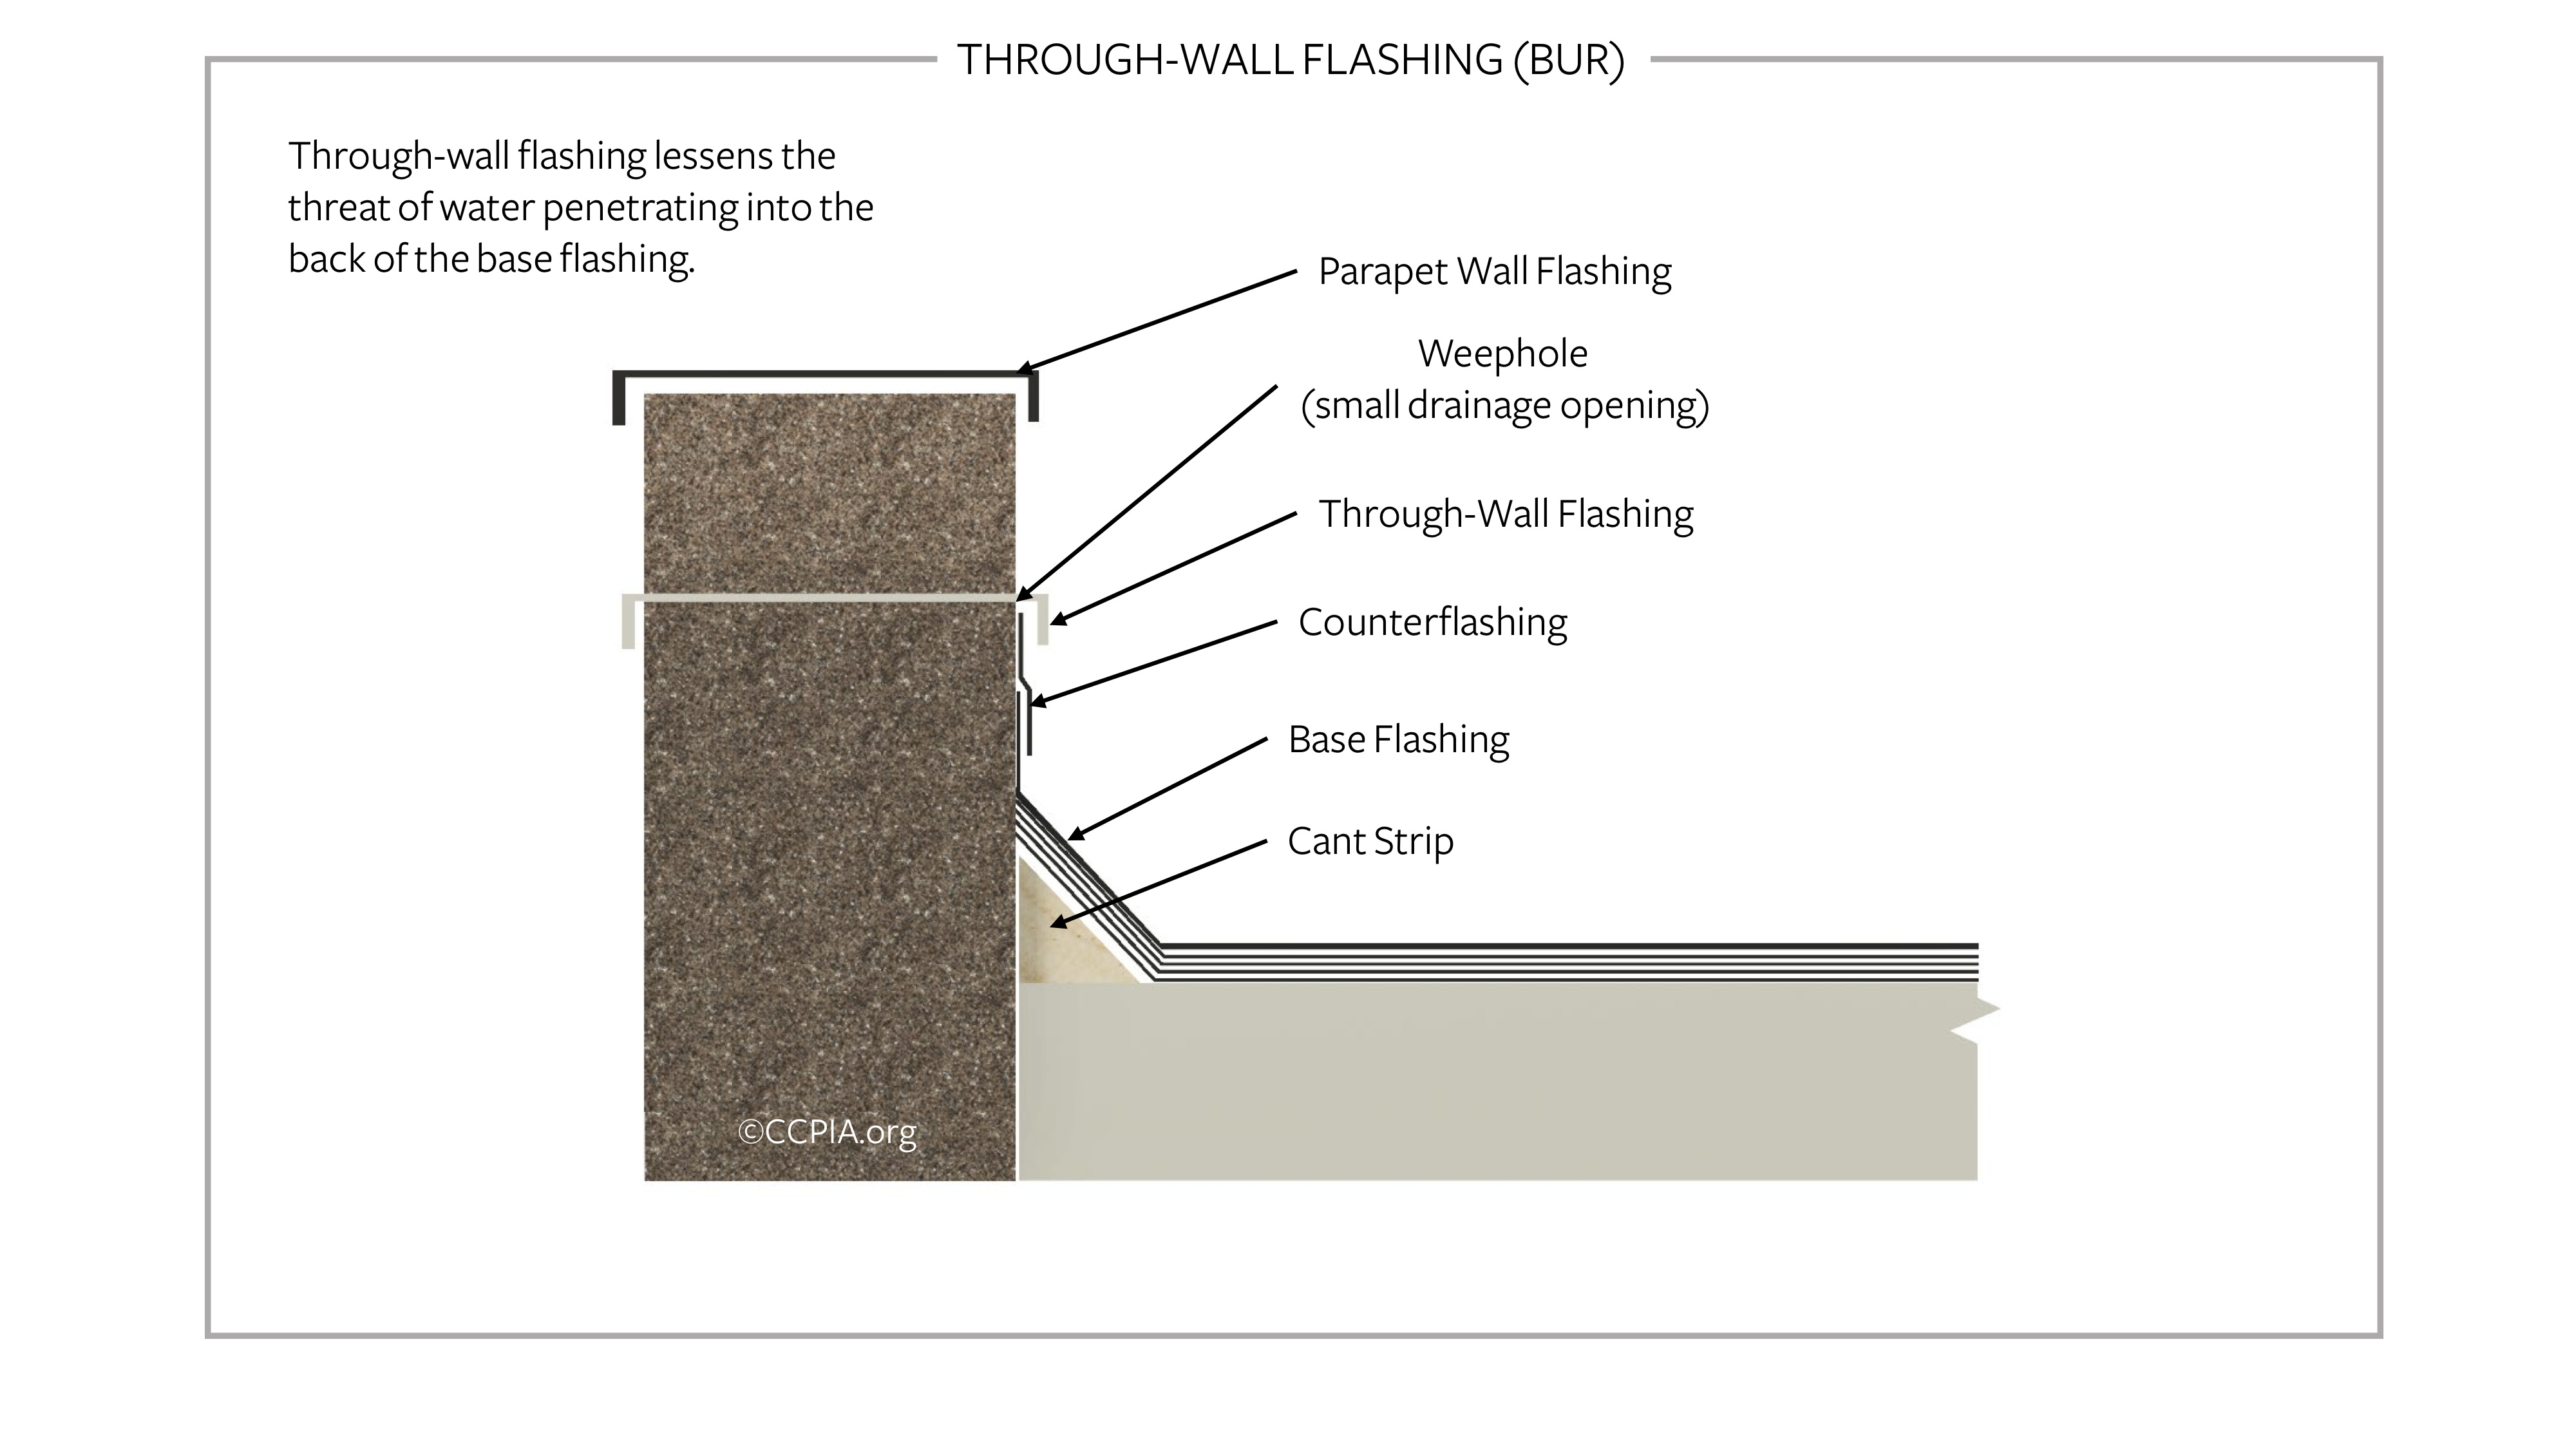
LowSlope Roof ThroughWall Flashing (BUR) Inspection Gallery InterNACHI®
Wall flashings are required at openings, corners, intersections, and wherever a roof terminates into a wall. While peel-and-stick tapes have replaced these flashings at many details, metal flashings are still preferred for many standard details and applications where the flashing is visible or needs to hold a shape or serve as a drip edge.
Flashing of RoofWall Intersections in Existing Homes Building America Solution Center
Scope. Install step and kick-out flashing at all roof-wall intersections to protect walls from water intrusion, and install boot or collar flashing at all roof penetrations to protect roofs from leaks. Install corrosion-resistant flashing pieces that are overlapped in a shingle fashion. Extend step flashing at least 4 inches up the wall from.

Roof flashings BRANZ Build
Step Flashing where a roof meets a wall Mr. Kongable 89K views 3 years ago Low-Slope Roof Self-Adhered Base Sheet Installation | How to install Self-adhered Membranes Polyglass USA Inc
InterNACHI Inspection Graphics Library Exterior » Wood siding » roofflashing.jpg
The flashing needs to be installed before installing the roof shingles. The metal flashing is formed with a hook edge and cleated on 12" centers. The flashing extends up the wall at least 4". The flashing extends onto the roof a minimum of 2 inches - 4 inches is preferable in more severe climate areas. Flashing joints are lapped 6" in the.
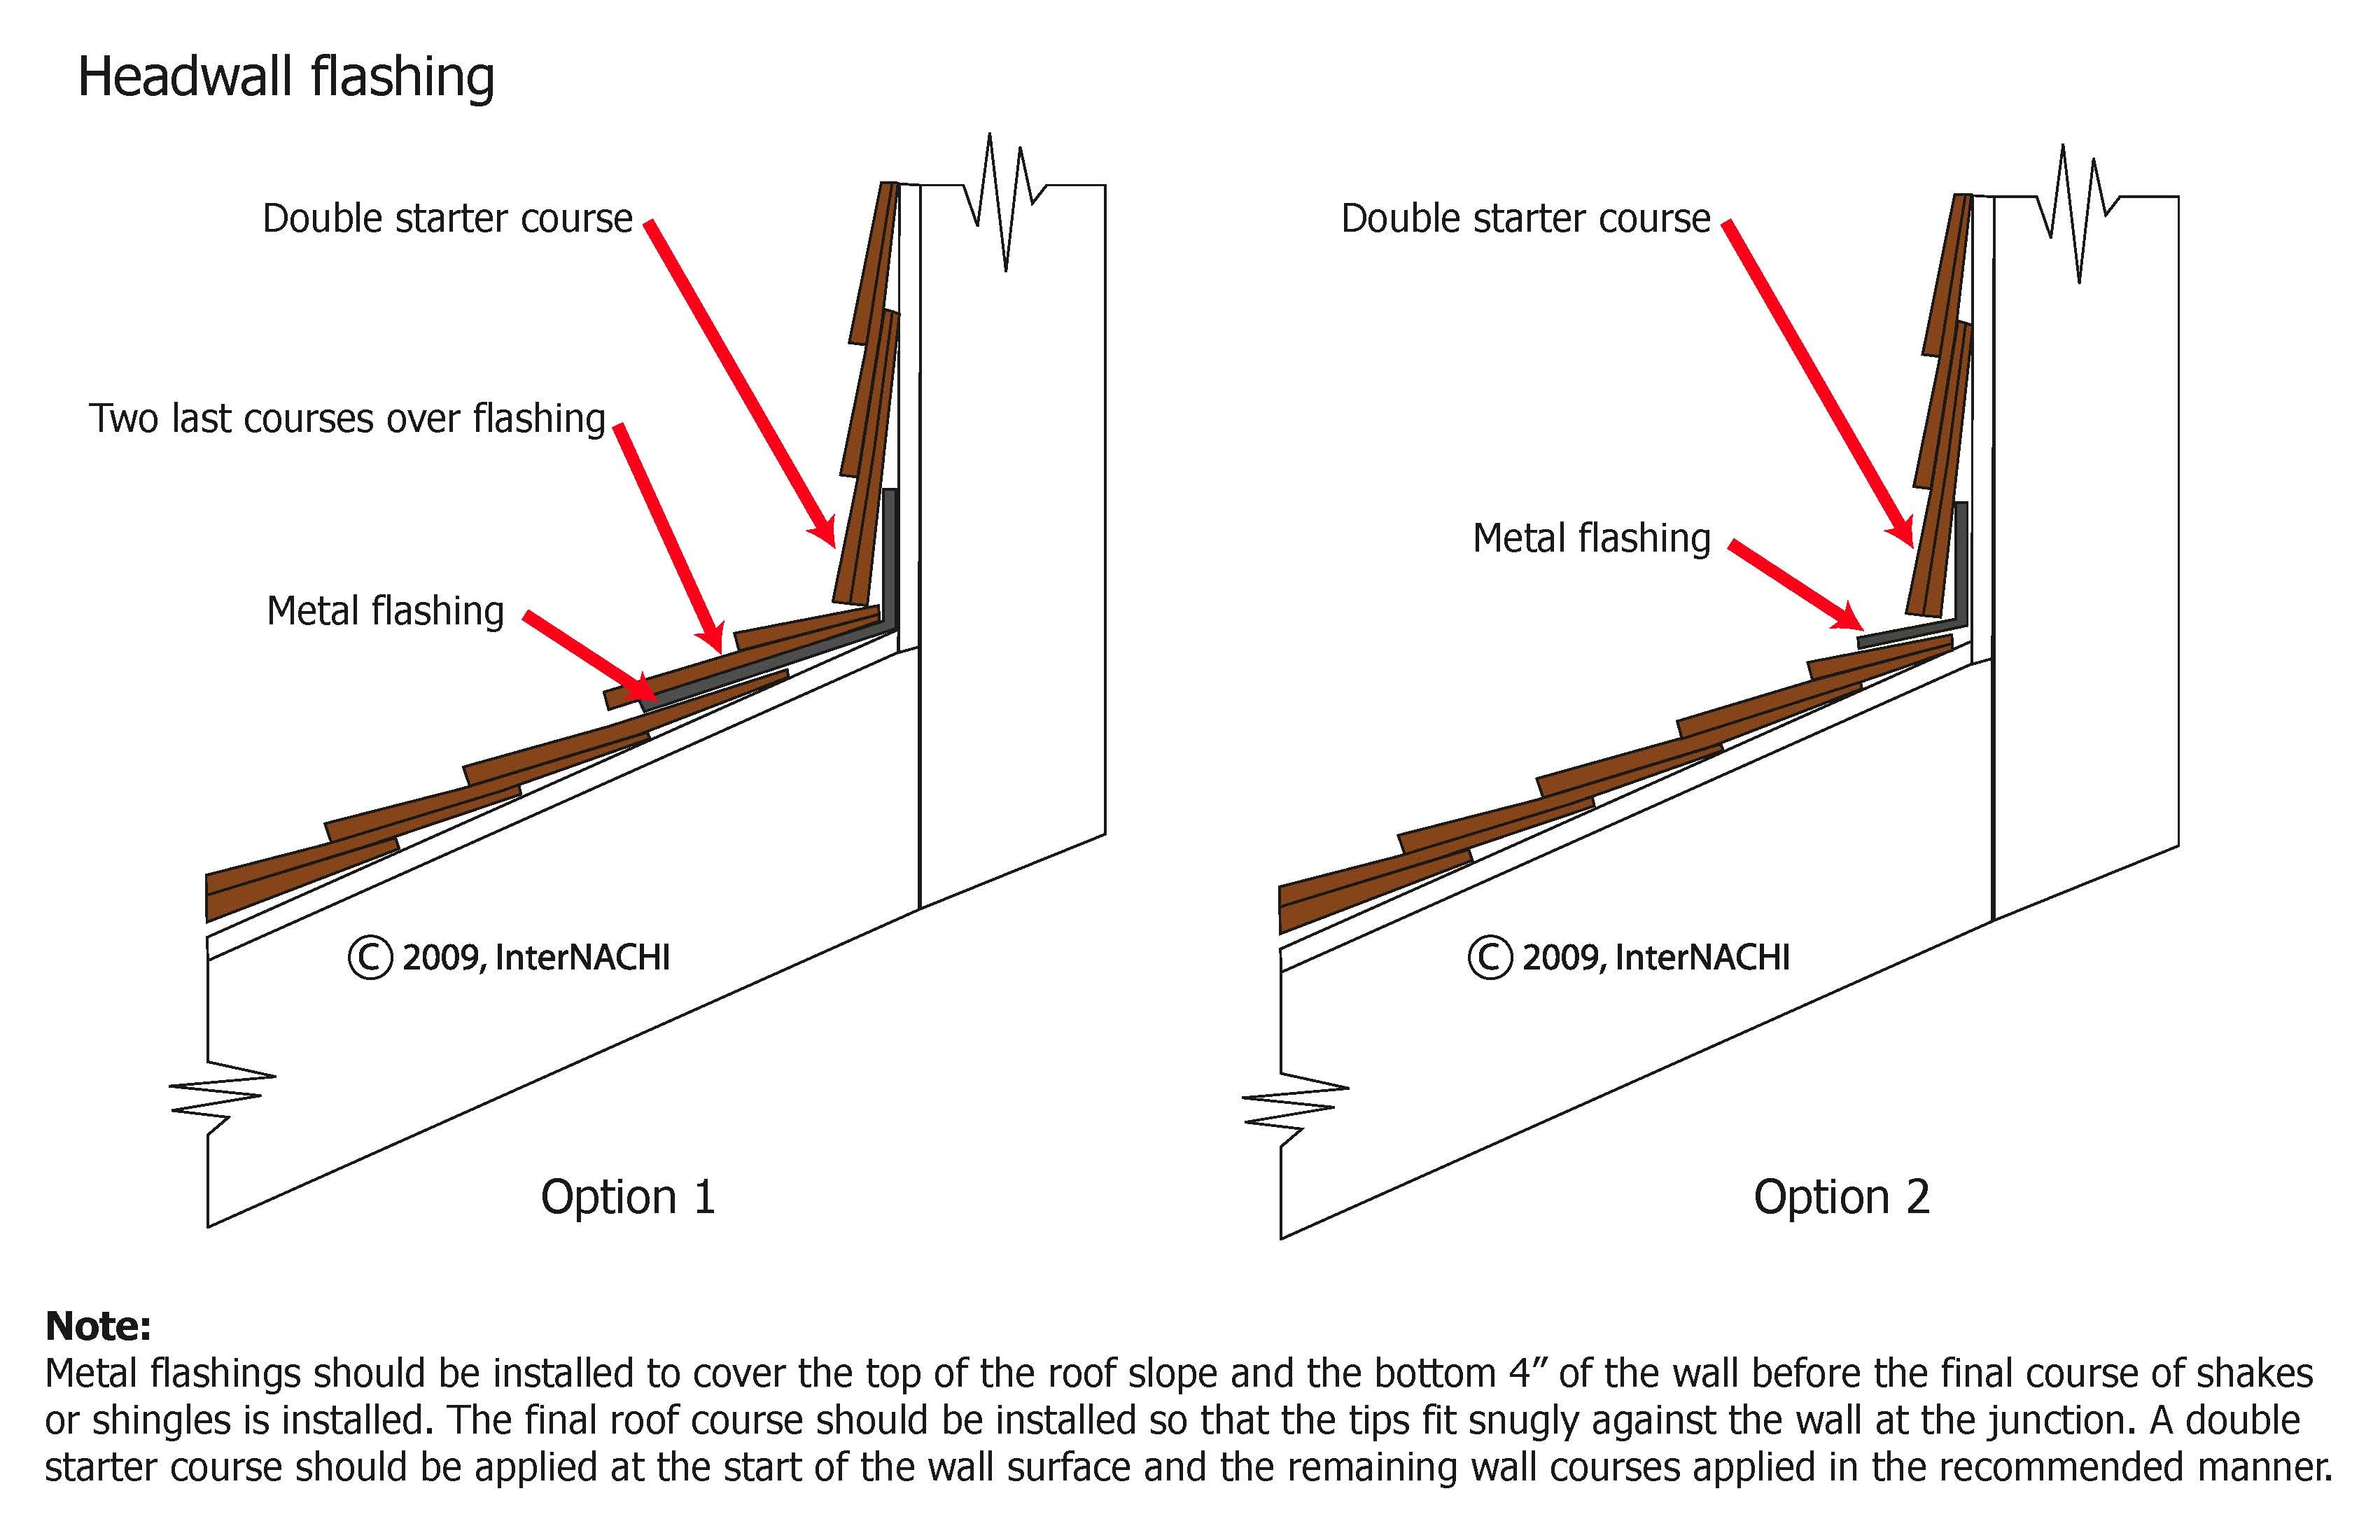
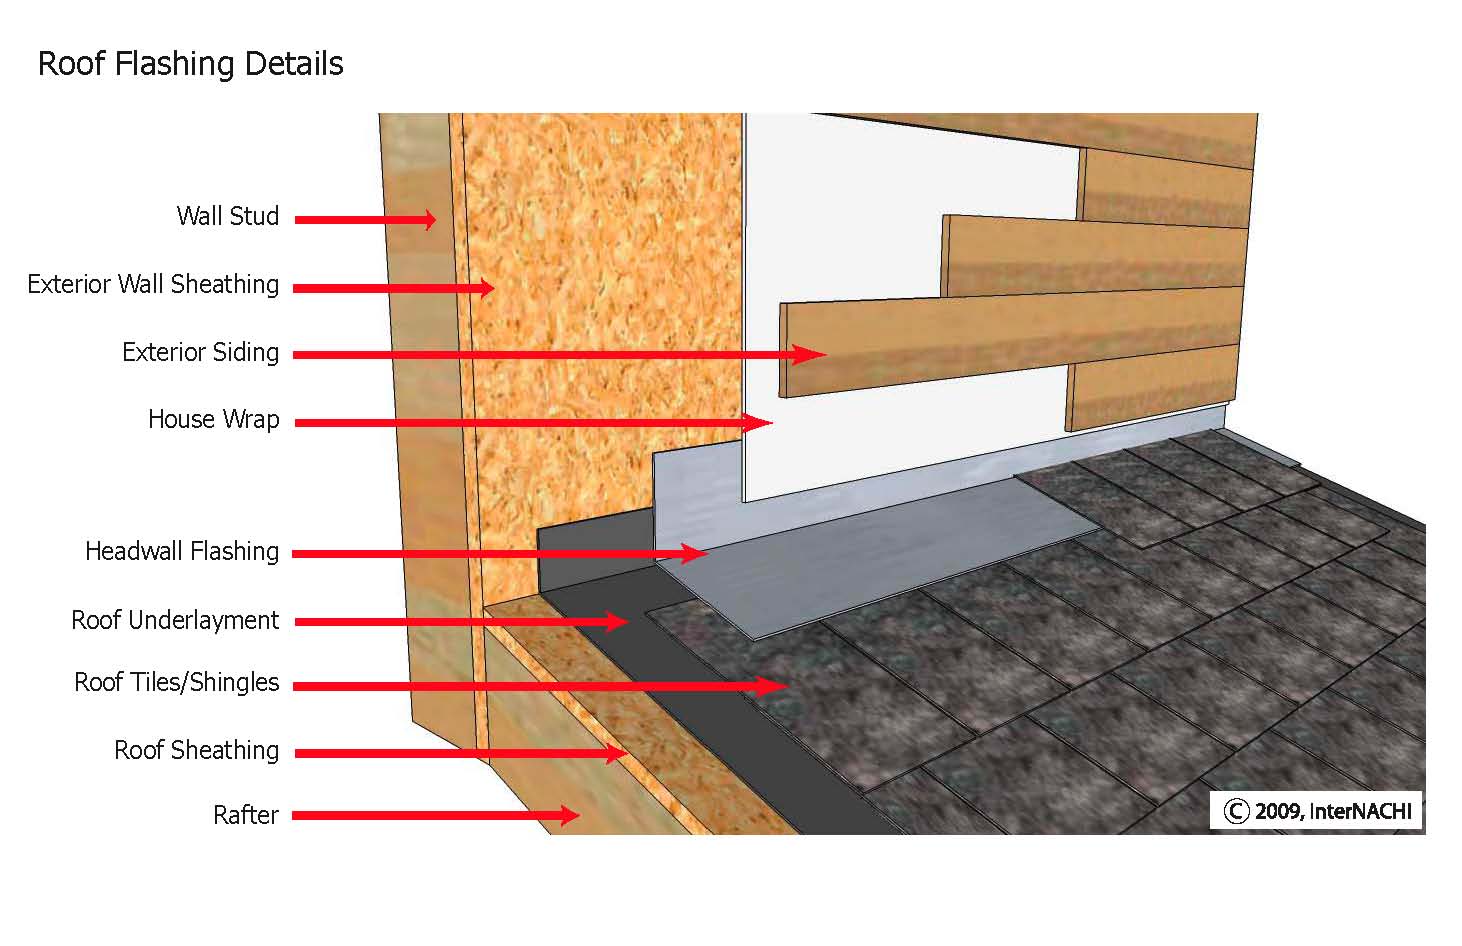
Headwall Flashing Inspection Gallery InterNACHI®
Since the risk of failure and cost of repair at roof-to-wall details is sky high (pun intended), some designers and contractors prefer to install two layers of flashing to ensure durable performance to hopefully eliminate call-backs. On some jobs we have seen stainless steel flashing and adhesive membrane flashing work together to provide.
