SENSOR DE MOVIMIENTO ARDUINO PIR INFRARROJO HC SR501 ⋆ Starware

HCSR501 PIR Motion Detector Module Electronics, Sensors, Robotics Online Shop
Looking For Arduino Pir Sensor? We Have Almost Everything On eBay. But Did You Check eBay? Check Out Arduino Pir Sensor On eBay.
/product/53/4871/2.jpg?8586)
Arduino Capteur de mouvement PIR HCSR501 à prix pas cher Jumia Tunisie
Introducing the PIR Motion Sensor. The PIR motion sensor is ideal to detect movement. PIR stand for "Passive Infrared". Basically, the PIR motion sensor measures infrared light from objects in its field of view. So, it can detect motion based on changes in infrared light in the environment.

Arduino Interrupts with PIR Motion Sensor — Maker Portal
Utilisation d'un capteur PIR avec Arduino. Si vous souhaitez utiliser un Capteur PIR avec Arduino, Je vous recommande de lire l'article sur le HC-SR501. Là, j'ai expliqué comment il pouvait être utilisé et intégré à un projet avec Arduino. Si vous avez acheté un autre modèle de capteur PIR, je vous recommande de lire la fiche technique.
Projet électronique Détecteur PIR Avec Arduino Arduino Cours Électronique Drone Matlab
HC-SR501 PIR motion sensor with Arduino UNO example code. With the following example code, you can read out the sensor and control the on-board LED of the Arduino (connected to pin 13). This code can also be used to control simple relays to turn a bigger light on or off. You can upload the example code with the Arduino IDE.
PIR sensor HCSR501 Arduino code and circuit
Code Arduino pour capteur de mouvement PIR. Code Arduino pour capteur HC-SR501 et la LED. Nous allons voir comment connecter le capteur PIR (HC-SR501) à l'Arduino (capteur de mouvement infrarouge pyroélectrique) et envisager un programma pour allumer automatiquement la lumière LED qui s'allumera lorsqu'un mouvement est détecté dans.

Arduino Uno et capteur PIR par ondine26 OpenClassrooms
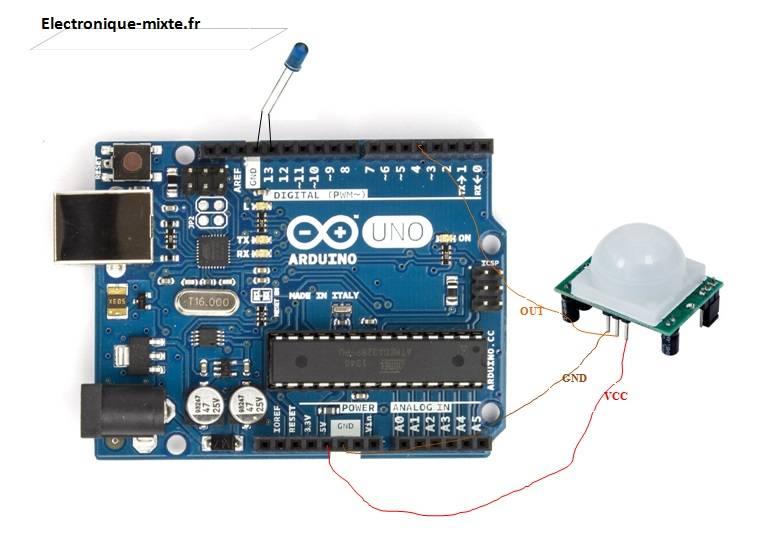
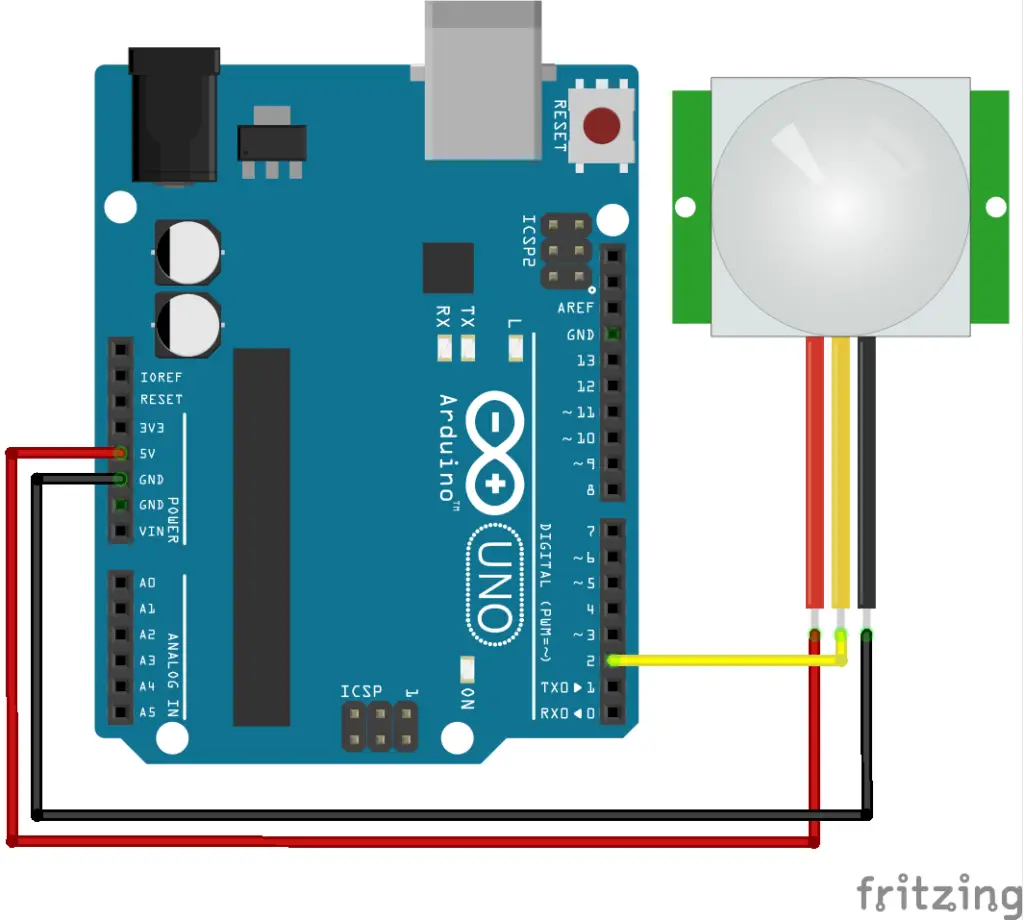
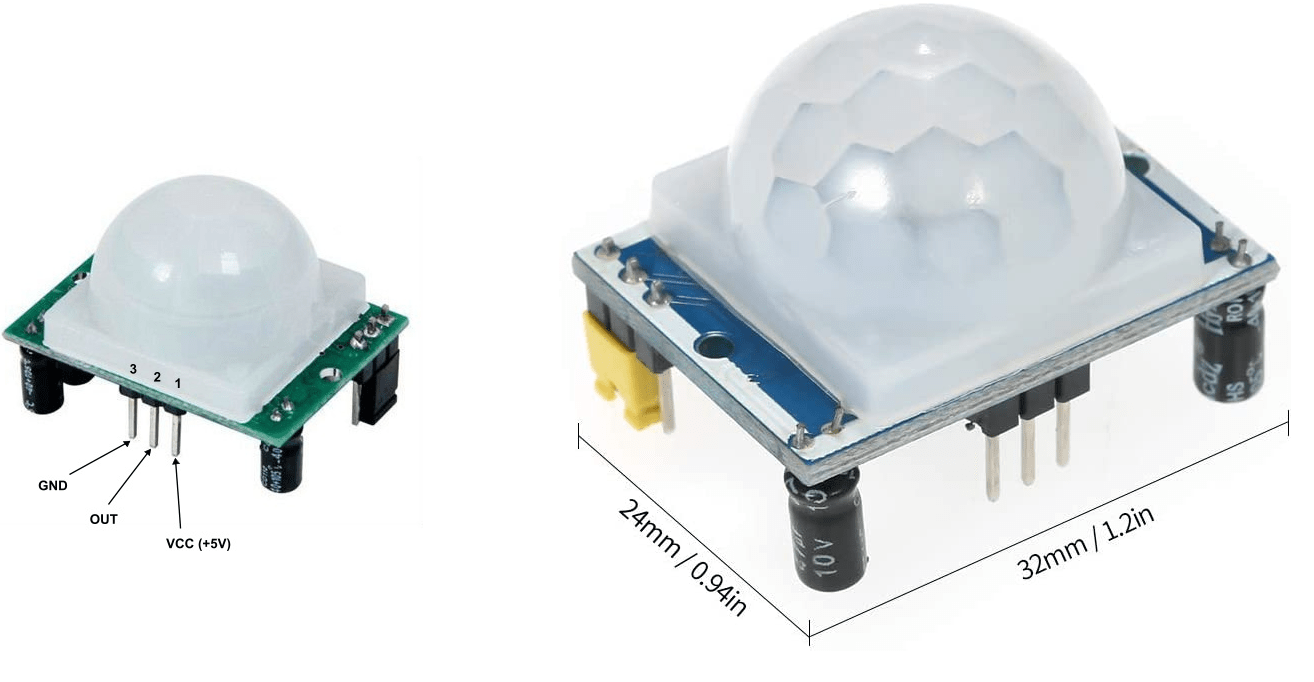
Le capteur PIR a trois bornes - V cc , OUT et GND. Connectez le capteur comme suit -. Connectez le + V cc à + 5v sur la carte Arduino. Connectez OUT à la broche numérique 2 sur la carte Arduino. Connectez GND avec GND sur Arduino. Vous pouvez régler la sensibilité du capteur et le temps de retard via deux résistances variables situées au.

Tuto Lire un capteur infrarouge avec Arduino Arduino, Capteur infrarouge, Capteur
Utilisation d'un capteur PIR avec Arduino. Il est possible d'actionner un système, comme un alarme, en détectant la présence d'une personne à l'aide d'un capteur de mouvement PIR. En domotique, il est courant d'actionner des appareils lorsqu'une personne rentre dans une pièce. Ceci est rendu possible grâce à des capteurs de.

Capteur De Mouvement Pir Hc Sr Arduino Raspberry Errachidia Maroc My XXX Hot Girl
In order to wire the SR505 to the Arduino, you need only three wires. The SR505 has three pins which are marked on the back: "-", "OUT", and "+". First, make sure that the SR505 is provided with enough voltage: One of the Arduino's GND pins must be connected to the SR505's "-" pin. Next, the Arduino's 5V pin must be.

PIR Sensor with Arduino Arduino, Sensor, Passive infrared sensor
Now we launch this new pyroelectric infrared motion sensor, specially designed for Arduino. This sensor integrates an integrated digital pyroelectric infrared sensor, and the connection pins. It features higher reliability, lower power consumption and simpler peripheral circuit. Special note:. 1. The maximum distance is 3-4 meters during testing.

PIR Sensor SR501+ , from DROIDS sas for €5.62
Drag a PIR motion sensor from the components panel to your breadboard, so its legs plug into three different rows. Click to create a wire connecting the rightmost leg to power. Connect the center leg to ground. Create a wire connecting the leftmost leg to Arduino analog pin A0.

Sensor Detector de Movimiento PIR Módulo HCSR501
Capteur PIR et Arduino : le câblage. Le câblage est extrêmement simple, comme le montre le schéma suivant : Il suffit en effet de connecter la broche + du capteur (qui ne ressemblera pas à celui du schéma, mais plutôt à celui de la photo en tête d'article) au 5V du Arduino (ou au 3.3V si votre carte fonctionne à cette tension), la.

Capteur De Mouvement Pir Hc Sr Et Arduino My XXX Hot Girl
Détecter des mouvements avec un détecteur Infrarouge (PIR) sur l'ESP32 avec du code Arduino (Mis à jour le 23/06/2023) Voici un capteur très intéressant pour détecter la présence d'une personne ou d'un animal : le capteur infrarouge passif, souvent appelé capteur PIR pour « Passive InfraRed ». Ce genre de capteur est fréquemment utilisé dans les systèmes d'alarme ou dans.
Sensor De Movimiento Pir Hcsr501 Alarma, Casa Domotica Arduino MercadoLibre
Step 3: Circuit Connections. Connecting PIR sensors to a NodeMCU is really simple. The PIR acts as a digital output so all you need to do is operate the pin to flip high (detected) or low (not detected). Check out the images for more details. Most PIR modules have a 3-pin connection at the side or bottom.

Automatic Room Light using PIR Motion Sensor Detector Security Alarm
Utiliser un détecteur de mouvement Infrarouge (PIR) sur la Pi Pico via du code Arduino (Mis à jour le 23/06/2023) Voici un capteur très intéressant pour détecter la présence d'une personne ou d'un animal : le capteur infrarouge passif, plus communément connu sous le nom de capteur PIR pour « Passive InfraRed ». Ces capteurs sont souvent intégrés dans des systèmes d'alarme ou.
Projet électronique Détecteur PIR Avec Arduino Cours Projets Divers
Introduction. In this tutorial we will check how to use a PIR sensor to detect motion, using an ESP32 and the Arduino core. Since a PIR sensor allows to detect motion, it means that we can use it to know when someone enters and leaves a certain area. That information can be useful, for example, to trigger an alarm or to turn on the lights.

Schema Du Montage Pir Et Relais Capteur Infrarouge Arduino Servo Images
Un capteur PIR HC-SR501 ( Disponible ici) Une Breadborad ( Disponible ici) Le montage avec Arduino. Il suffit en effet de connecter la broche + du capteurau 5V du Arduino, la broche gnd ou - à la masse du Arduino (Gnd), et la broche out/signal à la broche 2 de l'Arduino (ou une autre, au choix,pour notre exemple on utilisera la pin 2).
